
Have you been trying to figure out how to put Response Magic on your website? Do you feel like you’re always missing something whenever you try? That’s alright; I’ll guide you through it right now! Sure, I can help you with that! I’ll provide you with step-by-step instructions on how to add Response Magic to your website.
How to Set Up Response Magic Hey there! Let’s start from the beginning, shall we?
Hey there! I noticed that the YouTube video instructs you to copy and paste the thank-you page. That’s okay, there’s no need to worry! We’re excited to share that we’ve made some improvements to the system! Now, when you visit your site, you’ll find a thank you page already waiting for you. Next question, could you please let me know how to find it? That is one of the most brilliant questions I have ever heard!!
Thank You Page
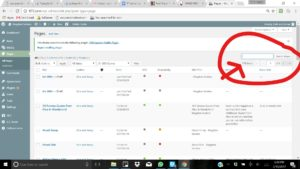
To get started, you’ll need to log in to the Admin dashboard of your WordPress website. Hey, on the left side of the dashboard, you’ll find a list of options. Look for “pages” and give it a click. Here’s where you can find the list of pages. There will be quite a few pages of these. Hello there!! I just wanted to let you know that if you look at the top right corner, you’ll find a search box. Put your cursor in that box and type “Thank you”. After that, you can either click the search button or simply hit the “enter” button on your keyboard. You should see a “thank you” page below now. Just click on it to open it. Once you’re there, you’ll be able to edit the page. The picture shows the search box, which is circled with an arrow pointing to it.
You might want to change the name of the website. It probably says “Garret’s Offers.” You can pick whatever name you want for your page or just slap your URL in there. Don’t forget to switch up the name at the bottom of the page too. Just give the page a read and make any changes you want to the content to make it say what you want. Just click the blue “update” button on the right side of the screen to save your work.
Embrace the opportunity to view your work!
Now that everything’s done, you just gotta find the “View Page” button up top in the green bar. Just click that button to go to the page. Here’s where you can check out how your page will look and grab your perma-link. Alright, now you gotta head over to the Response Magic site and get yourself all set up. Hey, click on the link below so we can get your account all set up! It’s free!
Unlock Limitless Possibilities with Your Free Account
Just click on “Create My Free Account” and then type in your name and email. Hey, can you come up with a username and password for me? Thanks! Hey, don’t forget to jot down your username and password, okay? Then just click “Create My Account”. This will take you to the next page. Don’t ever put a credit card in! Just scroll down and find the “No Thanks” button and click on it. So now you’ll be taken to another page that’s like, “Get Started…” and there’s this pink bar asking you to confirm your email address. You need to go to your email. Just find the email they sent you and click the link to verify your account. This will bring you back to Response Magic where you’ll have access to everything you need to set up your account.
Opt-in Form
So, you want to make an opt-in form and start building an email list. How about we begin with an email list? Just go to the top of the page and click on “Create,” then select “Email list.” On the next page, you need to come up with a title for your list. Just pop in your URL or the name you made for your page and then hit “Add List”. Easy peasy!
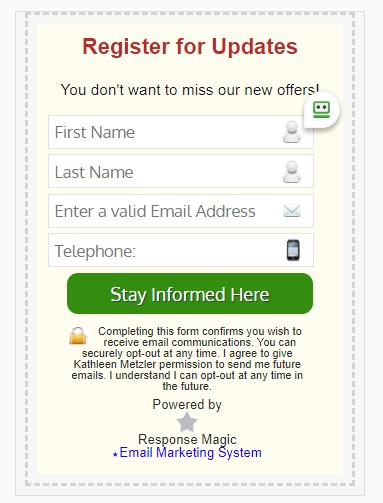
The new List will consistently appear at the bottom of this page. Currently, there is only one item on the list, so it is not a problem. However, please be aware that when you add a new item to the list, it will appear at the bottom. Please complete the necessary information, including your first and last name, email address, and Confirmation URL. The email you use for this needs to be one you will be able to respond to so if you need to set up a business email, do so now and then come back to us! The appearance will resemble the picture located on the left side.
Permalink
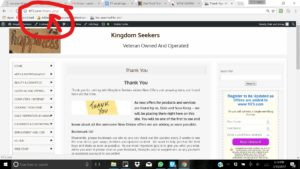
The Permalink is your confirmation URL. What is a permanent link? Go to your “thank you” page again. Make sure you are in the view site mode and not in your manager dashboard. Find the bar with your.com in it at the top of the page. Select all of the text, copy it, and then put it into the Confirmation URL box. Click “Update” after that. In the picture, a circle is drawn around the Permalink, and an arrow points to it.
The Opt-In form comes next, so return to the top and click “Create” once more. Plus, select the “opt-in form” option. In this way, customers may subscribe to your mailing list and stay up-to-date on all the fantastic deals you’re offering.
The Steps
Step 1: To get started, simply click on “select a list” and choose the list you have just created.
Step 2: Make sure your call to action is super clear, like giving straightforward directions. Here’s an example: Hey, make sure you sign up to get updates on new offers at www.1t31.com! Just copy and paste this statement into the “Your Heading” box for Response Magic. You can pick the color you want for your text. I like turquoise, so I went with turquoise.
So, there’s this box that says “Your Call to Action.” This is where you’ll put “So you won’t miss out on any new updates from us.” Feel free to change the wording. I tried to keep it straightforward. In this part, you should use only words instead of symbols like ” or ‘. Sure, feel free to skip the YouTube part and leave it blank.
Step 3: We suggest leaving this one blank and not worrying about it
Step 4: Right now, it says “Get Instant access, so you want to change it to “Stay Informed”? That sounds like a great idea! Sure, if you’d like, you can also change the button’s color.
Step 5: This part has a few questions and things to do, so let’s go step by step…
Choose “NO” to opt-in to Facebook.
You need to take “Rory Ricord” out of the white box on your privacy statement and put in your URL or the name of your page.
When someone fills out the opt-in form, choose “NO” on the alerts.
Click “Go to Custom URL” under “What action do you want to take once the form is filled out and submitted?” You will need your “Thank you” page’s Permalink again. Copy this and put it into the box next to “Go to Custom URL.”
“Include Powered by message below form is optional” is the next one. so you can choose whether you want that.
The Response Magic Code
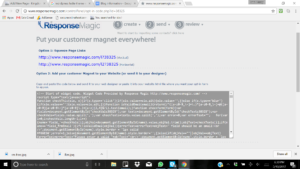
You now have all the information you need to finish this. Click “Submit & Get Code” now. There will be a new page. There are a few choices, and you want choice number 2. Coding is what is written in the box that looks like nonsense. You will mark the whole thing and then copy it.
That’s awesome! We’re almost there! You’re about to head back to your admin dashboard for your blog site! Please find the “Appearances” section on the left-hand side. Hey there! Could you please click on it? Thanks! You’ll see a sub menu when you click on the word “Appearances”. Sure, let’s locate the section called “Widgets” and click on it.
Place The Code
You should notice a few different things there, and on the right side of the screen you will see a section labeled “Available Widgets.” You will see four separate things on the left side of the page: the left side of the menu, the right content sidebar, the footer 1, and the footer 2. We are going to take care of a handful of things for you here so that you will be able to take care of things in the future as well.
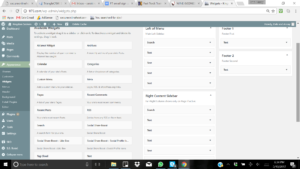
You will locate the “Text” box on the left side. Click and drag the icon to the “Right Content Sidebar” location. You will need to repeat this process twice to create two “text” boxes. In the upper “Text” field, click the arrow to expand the box. Here is where you will enter your Response Magic Code. Leave the “Title” field vacant and copy and paste the Response Magic Code into the “Content” field. Don’t neglect to click the Save button in the box’s lower right corner. Your Widgets page should appear identical to the image to the right. That is finished. The Response Magic box should now be on your page.